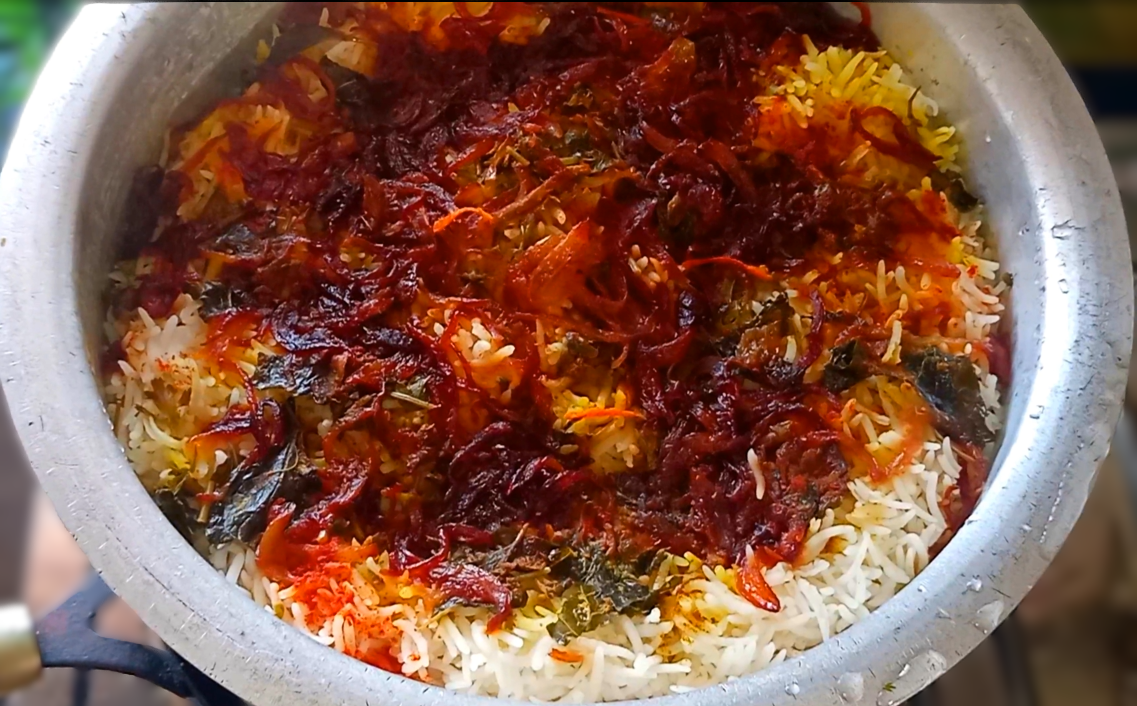
Hyderabadi Biryani | Authentic Hyderabadi Chicken Dum Biryani

Hyderabadi Chicken Dum Biryani or Hyderabadi Chicken Dum Biryani is one of India’s most popular and loved dishes.

Known for its rich flavors, aromatic spices, and tender chicken, this biryani is perfect for festive occasions or even a simple family dinner.

Making this dish at home may seem complex, but with this detailed recipe, you can achieve authentic flavors effortlessly.

Also Read:

Chicken Biryani

Paneer biryani

Fish Biryani

About Hyderabadi Chicken Dum Biryani 

Screenshot 346

Hyderabadi Chicken Dum Biryani is one of the most famous and delicious rice dishes in India, loved by food enthusiasts worldwide.

Originating from the royal kitchens of the Nizams of Hyderabad, this biryani is known for its rich flavors, aromatic spices, and unique cooking technique called “dum.”

The dish beautifully combines tender meat or chicken, long-grain basmati rice, and a medley of spices to create a flavorful and aromatic meal.

History and Origin

Hyderabadi Chicken Dum Biryani has its roots in the Mughal era when Persian flavors were brought to India by the Mughals.

It is believed that the dish was created by the royal chefs of Hyderabad by blending Persian and Indian cooking styles.

Over time, Hyderabadi Biryani evolved into its distinct version, becoming a symbol of Hyderabad’s rich food culture.

Types of Hyderabadi Chicken Dum Biryani

There are two main types of Hyderabadi Chicken Dum Biryani:

Kacchi Biryani: In this version, raw marinated meat is layered with partially cooked rice and cooked together on dum (slow-cooked) to perfection.

Pakki Biryani: Here, the meat is cooked separately, and the rice is boiled partially.

Both are layered and then cooked together to blend the flavors.

Key Ingredients

The main ingredients of Hyderabadi Chicken Dum Biryani include basmati rice, meat (chicken or mutton), yogurt, ghee, and a mix of whole and powdered spices such as cinnamon, cloves, cardamom, bay leaves, and saffron.

Fresh herbs like mint and coriander add freshness, while fried onions provide sweetness and depth.

The Dum Cooking Method

Dum cooking is the most important step in making Hyderabadi Biryani.

In this method, the pot is sealed tightly with dough or a heavy lid to trap the steam.

The sealed pot is then cooked on low heat, allowing the flavors to infuse evenly.

This slow-cooking technique ensures the meat becomes tender and juicy, while the rice absorbs all the spices and flavors.

Why Hyderabadi Chicken Dum Biryani is Unique

Hyderabadi Biryani stands out because of its perfectly balanced spices and the unique dum cooking technique.

The layering of marinated meat and aromatic rice creates a beautiful harmony of flavors.

Each grain of rice is flavorful, and the meat is tender and infused with spices.

Serving Suggestions

Hyderabadi Chicken Dum Biryani is best enjoyed with raita (yogurt-based side dish), mirchi ka salan (spicy chili curry), or pickled onions, chicken mutton curries etc.

These sides complement the rich and spicy flavors of the biryani.

Ingredients List of Hyderabadi Chicken Dum Biryani:

For Chicken Marinade:

  • Chicken: 1 kg (washed and cleaned)
  • Fresh curd: 250 ml
  • Turmeric powder: ½ tsp
  • Kashmiri red chili powder: 1 tsp
  • Spicy red chili powder: ½ tsp
  • Ginger-garlic paste: 3 tsp (equal amounts of ginger and garlic)
  • Green cardamom powder: ½ tsp
  • Vinegar: 1 tsp (or lemon juice as an alternative)
  • Biryani masala: 3 tsp
  • Green chilies: 3-4 (chopped)
  • Mint leaves: ½ cup (chopped)
  • Coriander leaves: ½ cup (chopped)
  • Salt: To taste

For Cooking Rice:

  • Basmati rice: 1 kg (soaked for 30 minutes)
  • Water: 3 liters
  • Ghee: 2-3 tsp
  • Bay leaves: 2
  • Green cardamom: 4
  • Cloves: 6
  • Cinnamon stick: 1 small piece
  • Shahi jeera (caraway seeds): ½ tsp
  • Salt: To taste

Other Ingredients:

  • Onions: 8 medium-sized (thinly sliced and deep-fried)
  • Mint and coriander leaves: For garnish
  • Oil: Remaining oil from fried onions
  • Biryani masala: 1 tsp
  • Ghee: 2 tsp

Step-by-Step Method:

Step 1: Marinate the Chicken

In a large bowl, add the chicken.

Screenshot 320

Mix in curd, turmeric powder, Kashmiri red chili powder, spicy red chili powder, ginger-garlic paste, green cardamom powder, vinegar, biryani masala, green chilies, chopped mint, coriander leaves, and salt.

Screenshot 322Screenshot 324

Screenshot 325

Combine everything well and marinate the chicken for 2-3 hours to let the flavors infuse.

Screenshot 341

Step 2: Fry the Onions

Heat oil in a pan and deep-fry the sliced onions until golden brown.

Screenshot 328

Remove and place them on a paper towel to drain excess oil. Reserve the remaining oil for layering.

Screenshot 329

Step 3: Cook the Rice

Bring 3 liters of water to a boil in a large pot.

Add bay leaves, green cardamom, cloves, cinnamon stick, shahi jeera, ghee, and salt.

Screenshot 331

Add the soaked rice and cook it partially—30% for the first layer and 70% for the second layer.

Screenshot 334


Step 4: Layer the Biryani

In a heavy-bottomed pot, spread the marinated chicken evenly at the bottom.

Screenshot 333

Add a layer of 30% cooked rice over the chicken.

Screenshot 335

Sprinkle fried onions, mint, and coriander leaves on top.

Screenshot 336

Add the second layer with 70% cooked rice and repeat the toppings.

Screenshot 338

Drizzle ghee, sprinkle biryani masala, and add the reserved onion oil. Garnish with additional mint, coriander leaves, and a pinch of Kashmiri red chili powder.

Screenshot 340

Step 5: Dum Cooking (Slow Cooking)

Seal the pot with a tight-fitting lid or aluminum foil to trap the steam.

Cook on high heat for 5 minutes.

Screenshot 342

Reduce the heat to low, place a tawa (flat griddle) beneath the pot, and cook for 40-60 minutes.

Screenshot 344

Once done, gently mix the layers to combine the flavors.

hyderabadi biryani

Your delicious and aromatic biryani is ready to be served!


Pro Tips for Making Hyderabadi Chicken Dum Biryani

Use Quality Ingredients: Always use fresh chicken, long-grain basmati rice, and authentic spices for the best flavor and aroma.

Marinate Properly: Allow the chicken to marinate for at least 2-3 hours or overnight. This ensures the chicken absorbs all the spices, making it tender and flavorful.

Do Not Overcook Rice: Cook the rice to 70% doneness. Overcooked rice can turn mushy during the dum process.

Layering is Key: Properly layer the chicken and rice to ensure even distribution of flavors and spices.

Seal the Pot Well: Use dough or a tight-fitting lid to seal the pot during dum cooking to trap the steam and infuse the flavors.

Cook on Low Heat: Dum cook the biryani on low heat for 40-60 minutes to allow the flavors to blend beautifully. Use a heavy-bottomed pan or place the pot over a heated tawa to avoid burning the bottom layer.

Fried Onions Make a Difference: Use golden brown fried onions generously for layering and garnishing. They add a sweet, caramelized flavor to the biryani.

Add Ghee and Saffron: Drizzle some ghee and saffron-infused milk on the top layer of rice for added aroma and richness.

Let It Rest: After dum cooking, let the biryani rest for 10-15 minutes before serving. This allows the flavors to settle.

Serve with Side Dishes: Pair the biryani with raita, salan (spiced curry), or pickled onions for a complete meal experience.


Frequently Asked Questions (FAQs)

1. What is Hyderabadi Chicken Dum Biryani?

Hyderabadi Chicken Dum Biryani is a flavorful dish made by layering marinated chicken and partially cooked rice, then slow-cooking (dum) it to perfection with aromatic spices.

2. How is dum cooking done?

Dum cooking involves sealing the pot tightly with dough or a lid to trap steam.

The dish is cooked on low heat, allowing the flavors to blend perfectly.

3. Can I use store-bought biryani masala?

Yes, you can use store-bought biryani masala if you don’t have homemade masala.

Choose a good-quality brand for authentic flavor.

4. Can I make biryani without ghee?

Ghee adds a rich aroma and flavor, but you can substitute it with vegetable oil if needed.

5. Is marination necessary?

Yes, marinating the chicken for at least 2-3 hours tenderizes it and enhances its flavor.

6. Can I use regular rice instead of basmati rice?

Basmati rice is recommended for its long grains and fragrance, but you can use other rice varieties if basmati is unavailable.

7. How do I prevent rice from sticking together?

Soak the rice before cooking and add a few drops of oil while boiling. Avoid overcooking the rice.

8. Can I make this Hyderabadi chicken dum biryani recipe spicy?

Yes, increase the quantity of spicy red chili powder or add green chilies for extra heat.

9. What sides go best with Hyderabadi Chicken dum Biryani?

Raita, salan (spicy curry), and pickled onions are traditional accompaniments.

10. How long should the biryani rest after cooking?

Let the biryani rest for 10-15 minutes before serving to allow the flavors to settle.

11. Can I make this hyderabadi chicken dum biryani vegetarian?

Yes, substitute chicken with vegetables like potatoes, carrots, beans, and paneer for a vegetarian version.

12. Can I prepare the hyderabadi chicken dum biryani in advance?

Yes, you can prepare the components (marinated chicken and partially cooked rice) a day before and assemble them when ready to cook.

13. How do I avoid burning the bottom layer?

Use a heavy-bottomed pot and place it on a heated tawa during dum cooking.

14. Can I use frozen chicken?

Yes, but ensure it is completely thawed and drained before marinating.

15. Can I skip fried onions?

Fried onions add sweetness and richness, so it’s recommended not to skip them.

16. How can I add more aroma to the biryani?

Adding saffron-infused milk or kewra water enhances the aroma of the biryani.

17. Can I use boneless chicken?

Yes, but bone-in chicken is preferred for better flavor and moisture.

18. What is the ideal ratio of rice to chicken?

The standard ratio is 1:1, but you can adjust according to your preference.

19. How do I make the biryani less oily?

Use minimal oil and ghee while frying and layering.

20. Can I use pressure cooker for biryani?

Yes, but ensure not to overcook the rice and chicken.

Use the pressure cooker without the whistle for dum cooking.

21. Why does my biryani turn mushy?

This happens if the rice is overcooked or the water quantity is too much during boiling.

22. Can I use yogurt substitutes?

Yes, you can use dairy-free yogurt or coconut cream if needed.

23. What can I do if my biryani is too spicy?

Serve with plain yogurt or raita to balance the spice level.

24. How do I get the layered look in biryani?

Ensure proper layering of chicken and rice. Do not mix it after layering.

25. How do I know when the biryani is cooked?

The rice will be fluffy, and the chicken will be tender when the biryani is done.

26. Can I add nuts and raisins?

Yes, fried cashews and raisins can be added for a richer flavor.

27. Is Hyderabadi Biryani the same as Lucknowi Biryani?

No, Hyderabadi Biryani is spicier and uses the dum method, while Lucknowi Biryani is milder and cooked differently.

28. Can I cook biryani in the oven?

Yes, you can layer the biryani in an oven-safe dish and bake it at 180°C (356°F) for 30-40 minutes.

29. How can I make biryani healthier?

Reduce oil and ghee, use lean chicken, and add more vegetables to make it healthier.

30. Can I freeze leftover biryani?

Yes, store leftover biryani in an airtight container and freeze for up to 1 month.

Reheat thoroughly before serving.


In Short, Hyderabadi chicken dum Biryani is a must-try dish for every biryani lover.

The tender chicken, aromatic rice, and flavorful spices make it a perfect choice for any meal.

Serve it with raita or your favorite curry, and enjoy the rich taste of this classic dish.

Try it today and impress your family with your culinary skills!


 Recipe Card:

hyderabadi chicken dum biryani

Authentic Hyderabadi Biryani | Hyderabadi Chicken Dum Biryani

359833d3144d68f0703179319ac508d5payal debnath
Hyderabadi Biryani is a delicious, aromatic, and richly spiced rice dish that combines tender chicken, fragrant basmati rice, and flavorful spices. This step-by-step guide will help you recreate the authentic taste of restaurant-style biryani right in your kitchen.
Prep Time 2 hours 30 minutes
Cook Time 1 hour
Total Time 3 hours 30 minutes
Course Main Course
Cuisine south indian
Servings 6 people
Calories 420 kcal

Ingredients
  

Ingredients List of Hyderabadi Biryani:

For Chicken Marinade:

  • Chicken: 1 kg washed and cleaned
  • Fresh curd: 250 ml
  • Turmeric powder: ½ tsp
  • Kashmiri red chili powder: 1 tsp
  • Spicy red chili powder: ½ tsp
  • Ginger-garlic paste: 3 tsp equal amounts of ginger and garlic
  • Green cardamom powder: ½ tsp
  • Vinegar: 1 tsp or lemon juice as an alternative
  • Biryani masala: 3 tsp
  • Green chilies: 3-4 chopped
  • Mint leaves: ½ cup chopped
  • Coriander leaves: ½ cup chopped
  • Salt: To taste

For Cooking Rice:

  • Basmati rice: 1 kg soaked for 30 minutes
  • Water: 3 liters
  • Ghee: 2-3 tsp
  • Bay leaves: 2
  • Green cardamom: 4
  • Cloves: 6
  • Cinnamon stick: 1 small piece
  • Shahi jeera caraway seeds: ½ tsp
  • Salt: To taste

Other Ingredients:

  • Onions: 8 medium-sized thinly sliced and deep-fried
  • Mint and coriander leaves: For garnish
  • Oil: Remaining oil from fried onions
  • Biryani masala: 1 tsp
  • Ghee: 2 tsp

Instructions
 

Step-by-Step Method:

    Step 1: Marinate the Chicken

    • In a large bowl, add the chicken.
    • Mix in curd, turmeric powder, Kashmiri red chili powder, spicy red chili powder, ginger-garlic paste, green cardamom powder, vinegar, biryani masala, green chilies, chopped mint, coriander leaves, and salt.
    • Combine everything well and marinate the chicken for 2-3 hours to let the flavors infuse.

    Step 2: Fry the Onions

    • Heat oil in a pan and deep-fry the sliced onions until golden brown.
    • Remove and place them on a paper towel to drain excess oil. Reserve the remaining oil for layering.

    Step 3: Cook the Rice

    • Bring 3 liters of water to a boil in a large pot.
    • Add bay leaves, green cardamom, cloves, cinnamon stick, shahi jeera, ghee, and salt.
    • Add the soaked rice and cook it partially—30% for the first layer and 70% for the second layer.

    Step 4: Layer the Biryani

    • In a heavy-bottomed pot, spread the marinated chicken evenly at the bottom.
    • Add a layer of 30% cooked rice over the chicken.
    • Sprinkle fried onions, mint, and coriander leaves on top.
    • Add the second layer with 70% cooked rice and repeat the toppings.
    • Drizzle ghee, sprinkle biryani masala, and add the reserved onion oil. Garnish with additional mint, coriander leaves, and a pinch of Kashmiri red chili powder.

    Step 5: Dum Cooking (Slow Cooking)

    • Seal the pot with a tight-fitting lid or aluminum foil to trap the steam.
    • Cook on high heat for 5 minutes.
    • Reduce the heat to low, place a tawa (flat griddle) beneath the pot, and cook for 40-60 minutes.
    • Once done, gently mix the layers to combine the flavors.
    • Your delicious and aromatic biryani is ready to be served!

    Video

    Notes

    1. Rice Quality: Always use good quality, aged basmati rice for the perfect texture and aroma. Soak the rice for at least 30 minutes before cooking to ensure even cooking.
    2. Chicken Cut: Use bone-in chicken pieces for more flavor. The bones release juices during cooking, enhancing the taste of the biryani.
    3. Biryani Masala: Homemade biryani masala gives the best flavor, but if unavailable, use a good-quality store-bought masala.
    4. Spice Levels: Adjust the spice levels according to your taste preferences. Kashmiri red chili powder can be used for color without adding extra heat.
    5. Herbs: Fresh mint and coriander leaves are essential for the authentic flavor of Hyderabadi biryani. Avoid skipping them.
    6. Layering Order: Ensure proper layering with the marinated chicken at the bottom and rice on top. This helps the chicken cook evenly while infusing the rice with its juices.
    7. Dum Cooking: For perfect dum cooking, use a heavy-bottomed pot to prevent burning. Placing the pot on a preheated tawa also ensures even heat distribution.
    8. Sealing the Pot: Use dough to seal the pot tightly for dum cooking, as it locks in steam and intensifies the flavors.
    9. Serving Suggestion: Serve the biryani hot with cooling raita, tangy salan, or fresh salad for a complete meal.
    10. Storage: Leftover biryani can be stored in an airtight container in the refrigerator for up to 2 days. Reheat gently on a stove or microwave before serving.
     

    Nutrition Chart Per Serving (Based on 1 Serving)

    NutrientQuantity
    Calories420 kcal
    Protein25 g
    Carbohydrates55 g
    Fat10 g
    Saturated Fat3 g
    Cholesterol80 mg
    Fiber4 g
    Sodium600 mg
    Potassium400 mg
    Iron2.5 mg
    Calcium60 mg
    Vitamin A200 IU
    Vitamin C5 mg
    Note: These values are approximate and may vary based on the specific ingredients and quantities used.


    Leave a Comment

    Recipe Rating